Sedna Installation Guide
This document describes installation of the Sedna XML Database. See also Quick Start
if you need the fastest way to understand basic facilities of the Sedna XML Database.
Contents:
- Installation from Binaries
- Sources Quick Build How-To
- Sources Complete Build How-To
- Install from Git Repository
- Post-Installation Setup
Installation from Binaries
Windows
Sedna is distributed as a single tar.gz archive which contains everything you need to run Sedna.
The installation process consists of the following steps:
- Extract archive (for example with 7-Zip) to any directory.
Note: path should not contain non-ASCII symbols.
- Optional: add the bin subdirectory of Sedna installation to the environment variable PATH.
- Refer to the Sedna Quick Start or to the
Sedna Documentation site for the details on how to run
and use Sedna XML Database.
Linux, FreeBSD, Mac OS X, Solaris
Sedna is distributed as a single self-extracting script. The installation process consists of running self-extracting
script and following its instruction:
chmod +x sedna-xxx-bin-xxx.sh
./sedna-xxx-bin-xxx.sh
The operating system user that is going to run Sedna must have r-w-x permissions for the following Sedna directories:
$SEDNA_INSTALL/data
$SEDNA_INSTALL/cfg
To grant the necessary permissions to the user on Linux/FreeBSD/Mac OS you can use the following command
(suppose, <sedna-user> is the user that is going to run Sedna):
chown <sedna-user> cfg data
You may need to perform additional post installation steps depending on your requirements and OS you run Sedna on.
Please check Post-Installation Setup section for further details.
Refer to the Sedna Quick Start or to the
Sedna Documentation site for the details on how to run
and use Sedna XML Database.
Quick Build How-To
- Install CMake 2.6 or higher. Refer also to the documentation of your OS
distribution for the details on how to install CMake.
- Download and extract Sedna sources distribution for your platform from
the Sedna Download page.
Here and after we suppose that
SEDNA_SOURCE is path of the extracted Sedna sources.
- Run the following commands to build and install Sedna.
CMAKE_INSTALL_PREFIX defines full path to the Sedna binaries
tree to be installed. It's recommended to install all Sedna files into one separate folder. For example:
-DCMAKE_INSTALL_PREFIX=/usr/local/sedna
will install Sedna binaries tree into /usr/local/sedna. Note: path should not contain non-ASCII symbols.
[On Unix]:
cd SEDNA_SOURCES
mkdir bld
cd bld
cmake .. -DCMAKE_INSTALL_PREFIX=<Install-Path>
make
make install
Note: some platforms provide gmake command instead of make by default.
[On Windows]:
<Run Visual Studio Command Prompt>
cd SEDNA_SOURCES
mkdir bld
cd bld
cmake .. -G"NMake Makefiles" -DCMAKE_INSTALL_PREFIX=<Install-Path>
nmake
nmake install
- Run
make sedna_library on Unix-like OS and nmake sedna_library on Windows if you need only Sedna library.
- Important: you may need to perform additional post installation steps depending on your requirements and OS you run Sedna on.
Please check Post-Installation Setup section for further details.
- The operating system user that is going to run Sedna must have
r-w-x permissions for the following Sedna directories:
<Install-Path>/data
<Install-Path>/cfg
Complete Build How-To
Prerequisites
Sedna is being tested on x86, amd64 (x64/x86_64) and PPC architectures. It's expected to build and run on the following platforms:
- Microsoft Windows 2000 and higher
- Linux (kernel 2.6 and higher)
- Mac OS X
- FreeBSD
- Solaris
To build Sedna from sources you need to download and extract sources package for your platform
from the Sedna Download page.
On Windows you can use 7-Zip to extract sources package.
Here and after we suppose that SEDNA_SOURCE is path of the extracted Sedna sources.
The following software packages are required for building Sedna:
- [Required] CMake 2.6 and higher. See the How to Install CMake
section below for the details on how to obtain CMake for your platform.
- [Required] C/C++ compiler.
Windows: CL version 12.00.xxxx (Visual C++ 6.0) or higher is required.
You can install free Express version of Visual Studio to
build Sedna on Windows
Unix or Linux: GCC version 3.x.x or higher is required.
- [Optional] For building Java API driver you need Sun JDK version 1.4 or higher.
How to Install CMake
The latest version is available from the CMake download page.
For Windows and Mac OS X just download installer from the CMake download page and run it.
On most Unix-like platforms it's also available via package distribution systems:
- Debian/Ubuntu Linux:
sudo apt-get install cmake cmake-gui
- Fedora Linux:
sudo yum install cmake cmake-gui
- openSUSE Linux:
sudo zypper install cmake cmake-gui
- FreeBSD, either:
pkg_add -r cmake
using sysinstall utility
using ports collection
Alternatively, you can build CMake from sources, a source package is also available from the
CMake download page.
Command Line Configuration
- Ensure that compiler and CMake are in
PATH:
[Hint] On Windows Run Visual Studio Command Prompt or Visual Studio
x64 Command Prompt if you want to build x64 binaries.
- One of the nice CMake features is "out-of-source" build support, which means not building in the source directory, but in dedicated
build directory. This keeps the source directory clean and allows for more than single build tree for the same source tree (e.g. debug
and release, 32 and 64 bit etc). We'll create subdirectory "bld" in the source directory for this purpose:
cd SEDNA_SOURCES
mkdir bld
cd bld
- Run initial configuration:
cmake ..
By default CMake will create make files on Unix-like platforms (Linux, FreeBSD, Solaris Mac OS X) and Visual Studio x32 project on Windows.
If you want to use another generator use -G option. For example:
cmake .. -G "NMake Makefiles"
command will generate nmake makefiles on Windows which can be then
build with nmake command line utility.
cmake .. -G"Visual Studio 9 2008 Win64"
command will generate Visual Studio 2008 x64 project.
- [Optional] Adjust configuration parameters. To list configuration
parameters run:
cmake . -LH
To list advanced configuration parameters run:
cmake . -LAH
To change parameter value just run something like:
cmake . -DSQL_CONNECTION=ON
Frequently used parameters include:
CMAKE_BUILD_TYPE - use Debug value to build binaries with debug
information and turned off optimizations. Default valaue Release.CMAKE_INSTALL_PREFIX - defines full path to the Sedna binaries tree to
be installed. It's recommended to install all Sedna files into one
separate folder.
For example: -DCMAKE_INSTALL_PREFIX=/usr/local/sedna will
install Sedna binaries tree into /usr/local/sedna. Path should not
contain non-ASCII symbols.EL_DEBUG - Set value to ON if you want to turn on all Sedna debug
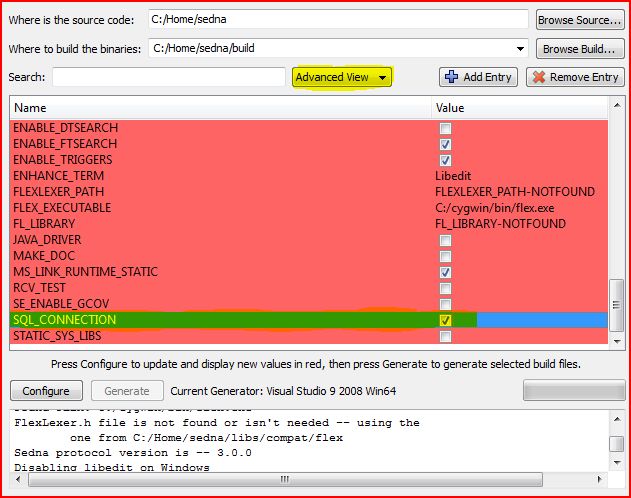
printings.SQL_CONNECTION - Adds support to SQL Connections. Set value to ON if
you want SQL Connection facility to be enabled. On Unix-like
systems, you may need to install ODBC development package (usually
unixODBC-devel) to build Sedna with SQL Connection facility
enabled.STATIC_SYS_LIBS - Links Sedna executables with static system libraries.
Set value to ON if you want to link Sedna executables with static
system libraries.ENHANCE_TERM - Possible values Readline, Libedit, None. Default
value on Unix-like OS is Libedit. On Windows - None, other
options are ignored on Windows.
Libedit (or readline itself) greatly increases the usability of
se_term - command line terminal for Sedna. It adds all of the standard functionality of the GNU
Readline library to the se_term command line, such as being able to
easily modify, edit, and retrieve command-history information with
the arrow keys.
Note, you may need to install either libtermcap, libcurses or
libncurses package (depending on exact OS type) to build Sedna with
libedit or readline support. In some cases (e.g. Debian, Ubuntu)
you have to install libtermcap, libcurses or libncurses development
package as well. Also you may need to install readline development
headers on some platforms to build with 'Readline' option.
Note, you can't use Readline option with STATIC_SYS_LIBS enabled. JAVA_DRIVER - Compiles Java driver. Set value to OFF if you don't
need java driver. If want to build java driver make sure that
you have java compiler in path.ENABLE_TRIGGERS - Turns on support for triggers (default). Set value
to OFF if you would like to turn support for triggers off.
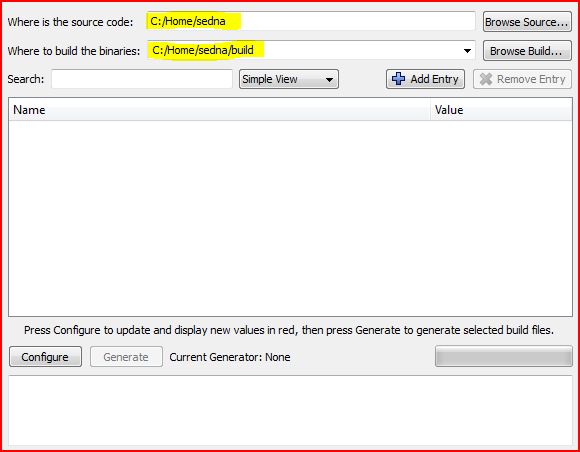
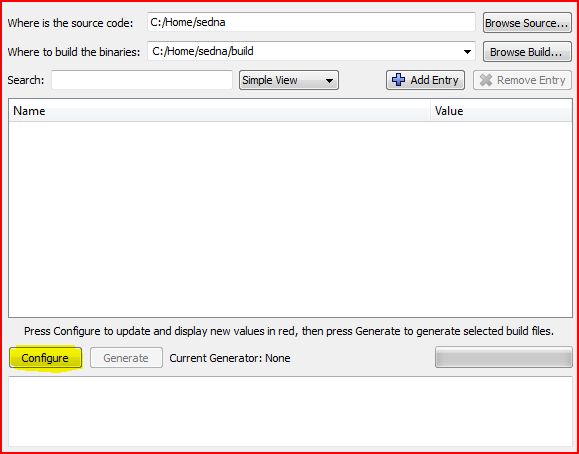
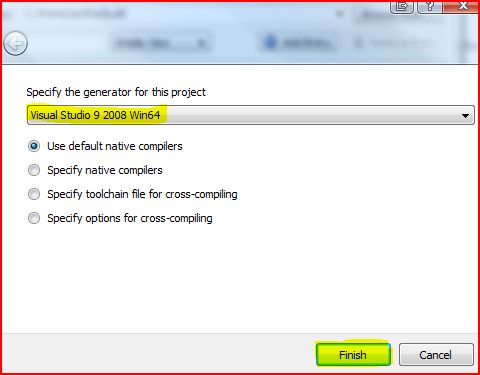
Configuration with CMake-GUI
If you have cmake-gui installed you can choose generator and adjust configuration with it:
Build and Install
If you need to build only C-driver (libsedna) refer to the Build C-driver section.
- Note, it's recommended to install all Sedna files into one separate folder. For example, use
-DCMAKE_INSTALL_PREFIX=/usr/local/sedna
configuration parameter to install Sedna binaries tree into /usr/local/sedna. Path should not contain non-ASCII symbols.
- You may need to perform additional post installation steps depending on
your requirements and OS you run Sedna on. Please check Post-Installation Setup section for further details.
- The operating system user that is going to run Sedna must have
r-w-x permissions for the following Sedna directories:
<Install-Path>/data
<Install-Path>/cfg
- To build and install Sedna:
[Unix] (Linux, Mac OS, FreeBSD, Solaris, etc)
On Unix-like OS just run make command in the directory selected for Sedna
binaries in the previous step:
make
Note, on some platforms gmake command is available by default instead.
In this case here and after we suppose that gmake can be used everywhere make is used.
If you want to see how compiler is invoked use verbose mode:
make VERBOSE=1
To install Sedna into directory defined by CMAKE_INSTALL_PREFIX run:
make install
[Windows]
The way to build Sedna depends on the generator you've chosen.
If 'NMake Makefiles' generator was used then
just run nmake command in the directory selected for Sedna binaries in the previous step:
nmake
To install Sedna into directory defined by CMAKE_INSTALL_PREFIX run:
nmake install
If 'Visual Studio XXXX' generator was used then:
- Run Visual Studio XXXX;
- Open solution file (it's located in path selected for Sedna binaries in the previous step).
- Select build type (Release, Debug, etc) you want.
- Run
Build -> Build Solution command to build Sedna.
To install Sedna into directory defined by CMAKE_INSTALL_PREFIX just build INSTALL project.
Build C-driver (libsedna)
For some languages drivers (PHP, Python, etc) you need just libsedna driver. In this case you can use target
sedna_library (sedna_library project in Visual Studio solution) to build only Sedna library. Run in
the directory specified in the initial configuration for Sedna binaries:
[Unix]
make sedna_library
[Windows]
nmake sedna_library
(or run 'Build' command on the sedna_library project if Visual Studio solution is used)
Dynamic and static versions of Sedna library will be placed into:
<Sedna-Binaries-Path>/driver/c
Visual Studio places them into:
<Sedna-Binaries-Path>/driver/c/<Build-Type>
where <Build-Type> can be Release, Debug, etc.
Advanced Topics
Installation From Git Repository
Sedna development version is available in the Git repository:
git clone git://modis.ispras.ru/sedna
To build repository version of Sedna you must install flex (>2.5.35) and
bison (>2.3). If you want to build documentation you'll also need TeX processing environmnet which
includes pdflatex utility.
To build and install Sedna tree follow the same instructions as in the Sources Complete Build How-To section above.
For convenience, a configuration script for developers (configure.sh) is provided. It includes most frequently used
Sedna configuration parameters:
sedna/configure.sh
Post-Installation Setup
To run Sedna on FreeBSD you may need to perform the following additional post-installation steps:
- Unfortunately FreeBSD (7.0, 6.3 and earlier) has a bug
in System V semaphores. To run Sedna you have to rebuild your kernel with
the patch you can get at the problem report page.
- Increase system IPC configuration either using sysctl utility
or through
/boot/loader.conf. Below possible values are listed:
kern.ipc.semmnu=256
kern.ipc.semmns=512
kern.ipc.semmni=256
kern.ipc.semmap=258
Note: reboot your machine after changing /boot/loader.conf.
By default Linux kernel doesn't allow to get as much semaphores as Sedna
actually needs to run 50 sessions (default maximum) simultaneously.
Extend some of the default kernel parameter settings. It is quite simple.
For example, here are instructions on how to modify the kernel.sem and
how to keep them set after a reboot:
Log on as a user with root authority. Open up /etc/sysctl.conf in a text editor and add entries:
kernel.sem = "250 64000 32 256"
Last number (SEMMSL) means system wide maximum of semaphore sets,
first (SEMMNI) defines maximum number of semaphores per set, second
defines total number of semaphores and usually must be equal SEMMSL*SEMMNI.
Note: se_gov + se_sm processes take apprx. 20 semaphore sets and
each se_trn (session) process takes 3 semaphores at least.
- Enter the
sysctl -p command to load in sysctl settings from
/etc/sysctl.conf.
- Enter the
ipcs -l to view the updated kernel parameters in sysctl.
|